Pixelmator, Acorn, Iris and DrawIt doing real-world tasks
This is a greatly enhanced version of my original comparison of Pixelmator, Acorn and Iris. Here's a list of changes:
- Due to popular demand, I've added DrawIt to the list of reviewed applications (I originally did not include it since I felt it was more of a vector image application)
- Acorn 1.1 is now officially out, so I've changed the review to take its changes into account (new features pertinent to this review include a new drop shadow filter, drag and drop support for moving layers between images, web export and speed improvements)
- Joshua Lund alerted me to the fact that you can push Caps Lock to get Pixelmator to draw the brush cursor in the correct size. I typically turn Caps Lock off on my Macs, so I never noticed this
In recent months, a lot of new image editors have appeared on the Mac platform. New APIs from Apple such as Core Image have allowed small, indie developers to create quite sophisticated image editing tools.
I've seen a few reviews of these applications, but the reviews mostly concentrate on user interface concerns. I'd like to do something different here; Instead of simply looking at their UI, I'd like to look at how these applications handle tasks I typically do. In this review, I'll look at three different tasks:
- Stitching a few shots to create a panorama image
- Adding a fancy title to a picture
- Creating a simple pixel image
I will not look at fixing levels, exposure and the like, since iPhoto does a pretty good job at that, and I think most people will use these editors in conjunction with iPhoto or even Aperture or Lightroom, using them to do tasks that involve layers and selections and pixel-level operations, features which iPhoto, Aperture and Lightroom don't provide.
Some Disclaimers
- I am using these apps on a MacBook Pro 2GHz Core Duo with 2 Gigabytes of RAM.
- I would have liked to also review Photoshop Elements 6, but I haven't got a copy of it yet.
- I bought licenses to all reviewed applications except DrawIt with my own money, and have no financial (or other) ties to any of the companies which make them. I used the DrawIt demo for this comparison. Of all the reviewed applications, I have the least amount of experience with DrawIt.
- Since I am used to Photoshop, and since Pixelmator works most similarly to Photoshop, I am most likely slightly biased towards Pixelmator.
- I am testing Pixelmator 1.1.2, Acorn 1.1, Iris 1.0b3 and DrawIt 3.3.3, which are the most recent versions of these apps at the time I'm writing this. Iris is still in beta and not a finished application.
- It may be slightly unfair to include an unfinished application in this comparison, but since it actually managed to do one of the tasks Acorn could not do, I decided to include it anyway. Still, keep in mind that Iris is still in beta. With that out of the way, let's get to the first task.
- Including DrawIt, primarily a vector drawing application, in such a pixel-oriented comparison may be a bit unfair, but it was a popular request after the first version of this comparison went online.
Manually Stitching Images
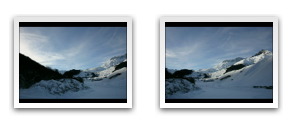
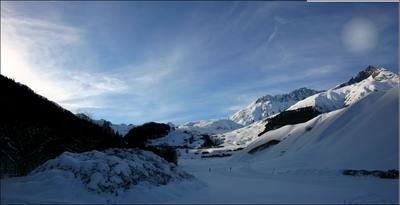
For this test, I'm going to manually stitch two images I took when creating this panorama image:
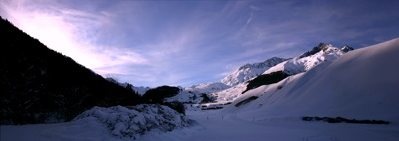
I took these without a tripod, so the images don't align quite properly.
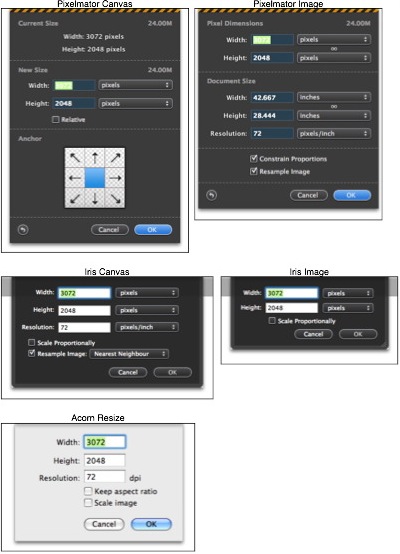
Each image is 3072 x 2048 pixels in size.
Pixelmator
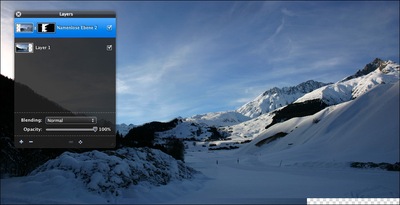
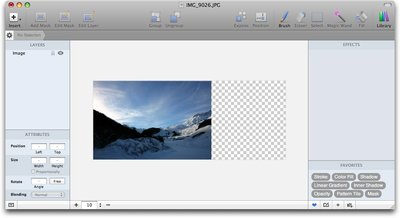
I start with the left image, making the canvas larger to add room for the second image. I add the second image as a layer using drag and drop, make it slightly transparent, and align the two images. I then add a mask to the second image's layer and start removing parts which don't fit. This all works very well and Pixelmator still works quite quickly, although not as quickly as in Photoshop.
By activating Caps Lock, the cursor can be changed into a circle with the actual brush size. This is a bit unfortunate, because Caps Lock changes the behaviour of other tools (such as the selection tool), and also because I typically turn the Caps Lock key off entirely.
Pixelmator has a masking mode which allows for creating selections by drawing into the image. Using this, it's easy to apply Filters to a selection, blurring it. Filters can also be applied to layer masks.
All in all, Pixelmator offers all the features needed, but could use a bit more speed and stability.1
Acorn
Again, I'm starting with the left image, resizing and adding the second image as a layer. Resizing tools are a bit less sophisticated than in Pixelmator; Unlike Pixelmator and Photoshop, Acorn does not discern between resizing the image, and resizing the canvas.
Acorn 1.1 introduced dragging of layers, so I simply drag the second image's single layer into the first, resized image. For large images, zooming with the slider becomes cumbersome; I prefer the zoom tool (Acorn provides a zoom tool, but it's hidden in its palette). Even though Acorn 1.1 seems faster than 1.0, it still feels sluggish when working with larger images.
Acorn does not support layer masks, which means I have to actually delete parts of the layer to stitch the images. Unfortunately, even when anti-aliased, the eraser tool leaves a sharp edge, which makes it impossible to seamlessly blur the two images together.

Stitching images in Acorn seems impossible.
Iris
First weirdness: You can't open Iris in an "empty" state. You're forced to either select an image to open, or create a new image. If you hit "close" on the welcome screen, not only does the screen close, but so does Iris itself. Another nit: Images open fully zoomed instead of zoomed to fit the window.
I attempt the same thing: I open the images, resize the left image (the cursor does not change to show the selected tool, which is extremely disconcerting), paste the second image. The Cmd-A shortcut only works after actually clicking into the image. Dragging layers does not work if there is no selection, which seems to make it impossible to drag parts of the layer that are outside of the image back into the image, since you can't select them. Strangely, layers are ordered from bottom to top, with the topmost layer in the Layers palette being the bottommost layer of the image.
I found no way to change the transparency of layers. There's a context menu on layers which has commands that seem to set layer filters, but the commands don't do anything.
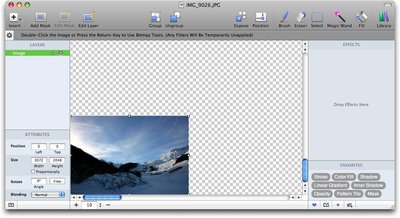
What Iris does have is a rather neat little editor for brushes and the eraser. Using this, I can create a large soft brush and erase the parts of the image I don't need (see brush stroke on top right of the stitched image).
while Iris is missing most of the features I would have liked to use for this task, it does offer enough features to get the task done.
DrawIt
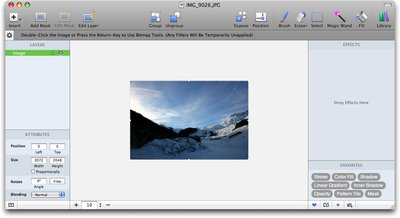
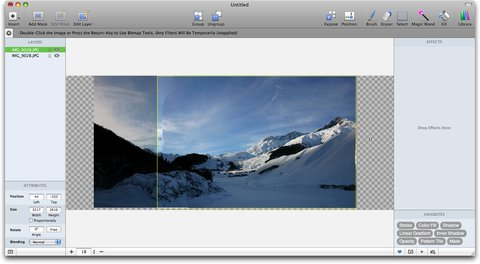
I again start by opening the first image in DrawIt. Unfortunately, even resizing the canvas to accommodate the second image creates issues. For some reasons, using "Edit" -> "Change Document Size" not only changes the size of the canvas, but also the size of its image layer (as soon as I select it), which stretches my first image. Undo only works inconsistently and, in some cases, does not redraw the image properly until I zoom in and out again. This is actually all very strange. Here's the image after I've opened it:
This is what it looks like after "Edit" -> "Change Document Size":
So far so good. However, when I then click on the "image" layer, this happens:

And hitting Cmd-Z leaves me with this:
Until I zoom in and zoom out again, at which point I'm back where I started:
This approach obviously does not work due to some bug (presumably - maybe everything works correctly and I just don't understand what I'm supposed to do). So I create an empty new image with the proper size and paste the two layers. This actually ends up working. There is no obvious way of making layers partially transparent, so aligning the two layers is quite hard. DrawIt has a masking feature, but figuring out how it works is - as with most things in DrawIt - hard. The documentation suggests that there's a Screencast that explains masks, but... which one is it? After a bit of playing around, I figure out how masks work. I also find out that it's possible to change the brush size and softness by clicking on the gear to the left of the Image label above the layers area (although sometimes, clicking on the gear simply removes the image breadcrumbs without displaying the tool settings). In general, the UI feels alien. I actually can't figure out how to delete a layer, and now I can't select my second layer anymore; as soon as I select it, DrawIt freezes for a few seconds and then deselects it again.
I decide to start again. Create new empty image of the proper size. This time, I drag the two images into DrawIt right from the Finder. On my first attempt, I can't select the two layers after that. So I start fresh again. This time, it works. As in Iris, Layers are ordered backwards (Layers which are further down in the list appear above layers which are above them in the list). I add a mask and start editing it. Unfortunately, I somehow end up with an image that has a bright white line in the middle that I can't remove. I'm starting to question my sanity. And now the app "unexpectedly quits" on me.
Starting fresh yet again. This time, I get a bit further. And then, I find out that brushes stop working after their softness is set to a value outside of 0 and 0.44. Which means I can't merge the two images.
Admittedly, I am now sitting in a corner, weeping like a little child. The application's strange modal interface makes sure you often don't know quite what mode you're in, and thus what clicking on the image is actually going to do. Modes switch unexpectedly (for example, entering a softness for the brush and hitting return switches your tool to the default move tool, which means that trying to paint then actually moves parts of your image), and the app is sluggish and buggy.
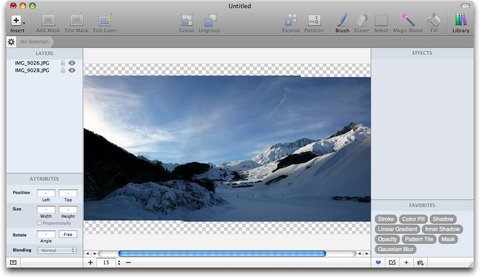
Trying again a day later, I manage to stitch the two images quite quickly, partly due to DrawIt behaving a bit better, and partly due to me knowing how masks work in DrawIt, and how I can work around the issues I encountered. Still, the brush can't be made soft enough for a nice stitch, although the final result looks a lot better than Acorn's:
Fancy Title
For this task, I'd like to add a fancy title to an image. The title should have a background image and a drop shadow.
Pixelmator
I open the image I want to put the title on. Using the type tool, I type the title. I add the image I want to use as a background for the type as a new layer. I Option-click on the border between the type layer and the new layer to make the new layer the background of the type layer. I then duplicate the type layer, rasterize the duplicate, blur it and move it a few pixels down:
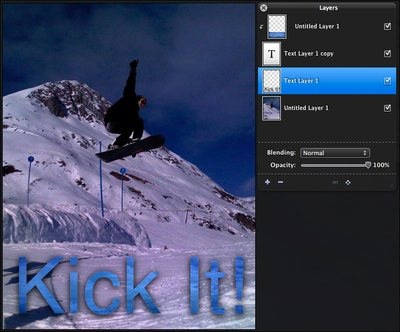
Layer filters would have been useful for the drop shadow, but Pixelmator doesn't provide them. Other than that, adding a title in Pixelmator is easy.
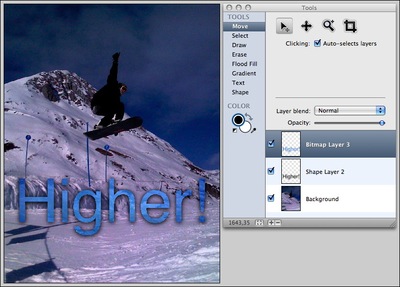
Acorn
Again, opening the images, adding the type, adding the background image. Acorn does not allow using layers as backgrounds for other layers. Instead, I rasterize the layer and use the magic wand to select the letters. I then invert the selection and cut out the parts of the background in the selection. Using Acorn's Drop Shadow filter, I add a drop shadow to the text background layer (adding Drop Shadow to a type layer would require rasterizing the layer first, but since I had to do that anyway, it doesn't matter).
Iris
I can't do this task in Iris as the type tool is too broken.
DrawIt
I open the image in DrawIt. I add the text background image as a layer. I add a mask to the text background image and type in the text. Unfortunately, adding an effect to this layer only adds the effect inside the mask, so I add a text layer for the shadow, enter the text again, and add a blur filter. The "add" button displays the menu for selecting which effect to add in a weird place, but it works anyway. I first add Gaussian Blur to the effects list.
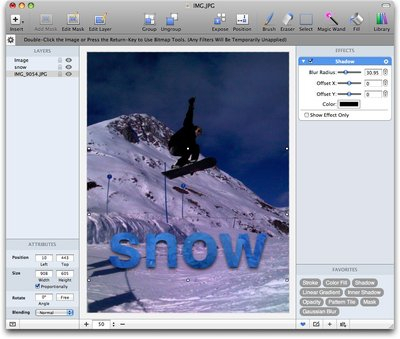
All of this actually works really well.
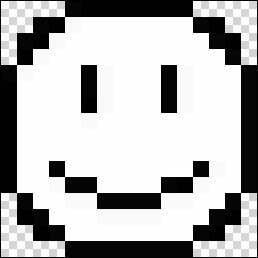
Pixel Image
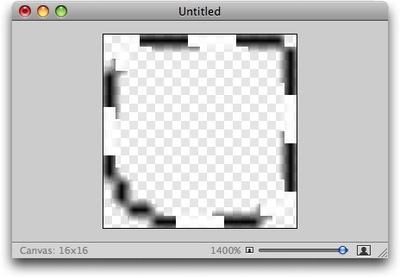
In this task, I want to create a smiley image for something like a chat application. The image is 16x16 pixels large and has black, white and transparent pixels.
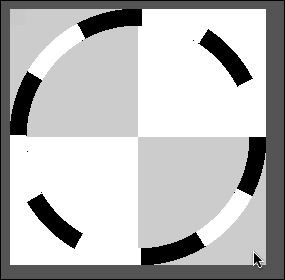
Pixelmator
I create a new image. Turning off anti-aliasing, I create a circle and fill it with black. I then create a smaller circle and fill it with white. Using the pencil tool with a size of 1 pixel, I draw the face. Switching between black and white is a bit of a chore, since I can't just alt-click to get the eyedropper, and switching background and foreground color requires the use of the context menu. Still, Pixelmator works reasonably well for this type of work.
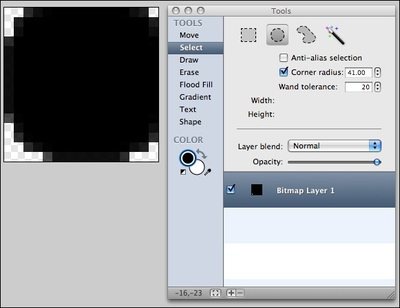
Acorn
At first, zooming seems limited to 1000%, which is a bit small for a 16x16 pixel image. Fortunately, it is not actually limited; instead of using the slider, click on the image to the right of the slider to zoom larger than 1000%.
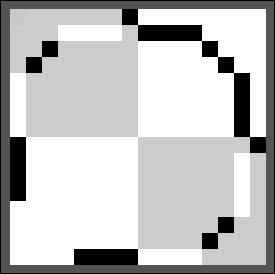
Again, I create a circle. For some reason, the selection looks really weird:
Unfortunately, flood-filling the selection doesn't look any better, and the circle is anti-aliased despite anti-aliasing being turned off:
Acorn's selection tool seems to select something else than it tells you it will. Here's the selection while the tool is in use:
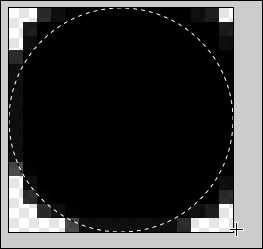
But this is what actually seems to be selected:
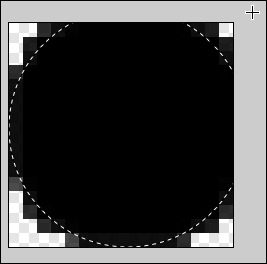
I try to work around this by selecting smaller circles, but nothing works out to the circle I want.
It would be possible to use the bottom-left "good" side of the circle for all four corners of the image, but at this point, it's quite obvious that Acorn does not seem suitable for this type of task.
I also tested the most recent beta version of Acorn, and the selection tool behaves the same in that version.
On the plus side, though, Acorn does have a nice feature which the other two lack: A web export panel.
Iris
Strangely, Iris has similar issues. This selection:
Creates this circle:
Which looks like this when filled in:
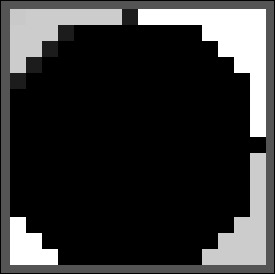
Again, I stop as the application seems unsuitable for this type of task.
DrawIt
There seems to be no way of turning off anti-aliasing in DrawIt, so this task can't be done.
User Interface
When I said I wouldn't say anything about the user interface of these apps, I lied. But I promise to keep it short.
Pixelmator's UI is very close to Photoshop's. If you're familiar with Photoshop, you'll instantly be familiar with Pixelmator, which is good. Unfortunately, this means Pixelmator also inherited Photoshop's mess of palettes, which means this application works best if you have either a really large screen, or more than one screen.
People are raving about Acorn's UI, but I find I often have to click twice to select a tool, which starts to get slightly annoying if you constantly switch between tools. Going with text-only labels for tools also makes it hard for me to figure out which one to click - each time I switch tools, i have to scan the list, reading entries until I find the one I want. And finally, since the tool window is so wide, it often overlaps with the image; there's no easy way to only show the stuff I need, the tool window always has the same size. I think Acorn's UI, while interesting, is ultimately flawed.
Iris shows the list of open images as a horizontal list at the bottom of the screen, which is neat. Unfortunately, I can't drag images from the Finder into the list to open them. Still, I really like this. I don't like the tool palette. The icons are a bit ugly, and clicking on some of them opens a small menu, without their buttons giving any indication that they aren't normal buttons. Also, you don't see which tool is selected from looking at the tool palette.
DrawIt has a really strange interfact with many modes. While it offers pixel editing features, it actually feels more like a vector application. If you often have to mix and match pixels and vectors in a single image (and used to like Deneba's Canvas), this application might be for you.
Unfortunately, all of the editors are missing basic keyboard features, like holding down Option to get the eyedropper, drag modifiers like holding down shift to move only horizontally or vertically, holding down shift to open circle or square selections, holding down option to duplicate things, holding down shift to retain the ratio when resizing things, holding down shift to draw straight lines or create vertical or horizontal gradients, holding down shift while clicking twice to draw a connecting straight line between the two.
And finally, despite of what you might have read, none of these apps are particularly fast. While they start up pretty quickly, actually working with them with large images can become painfully slow. Photoshop remains the only application which can work with really large pictures and many layers.
Conclusion
Unfortunately, unless your needs are very basic, at this point I can only recommend Pixelmator, though even Pixelmator is not suitable for advanced image editing involving large images and many layers. And while Pixelmator is the most full-featured application of the three, it's still missing useful and somewhat basic features such as layer effects, rulers, guidelines or web export with jpg preview.
Iris is still in beta, and it shows: a lot of features don't work or are buggy. It's not usable for actually getting anything done.
Acorn is missing too many fundamental features. It's okay for very basic image manipulations and it has some neat filter features, but for the tasks I tried to do in this review, Acorn's features are too basic. Furthermore, many features seem to still be a bit buggy.
Both Acorn and Iris lack precision when working with selections on the level of single pixels, and turning off anti-aliasing on selections does not seem to actually turn off anti-aliasing.
Pixelmator is the most full-featured editor of the three. It offers most of the features people actually use. If you don't intend to work with large images with many layers, this editor might actually be adequate for you. Of the three editors, Pixelmator has the least amount of deficiencies for the type of work I do, and it actually replaced Photoshop for all non-demanding tasks.
DrawIt offers the most vector-related features. This actually is a vector image application more than a pixel-based one. While DrawIt has a strange, unfamiliar interface, is sluggish at times, and seems to suffer from quite a few bugs, it actually offers many interesting features. If you work with pixels and vectors in the same image, this app is definitely worth a look.
Even with their obvious flaws, all editors are extremely promising and interesting, and I hope and expect that they all will become viable options for prosumers within the next year.
Further Reading
Jon Whipple has written a similar comparison of Pixelmator, Acorn and DrawIt.
-
I should point out that I originally stitched the full panorama in Pixelmator. Once the image reached a certain size, Pixelmator started crashing frequently. ↩︎
If you require a short url to link to this article, please use http://ignco.de/6